Onboarding configuration guide#
This document will walk you through the configuration necessary to get up and running with Argus PBI for your organization. If you need any help, please do not hesitate to contact support and we can answer any questions or walk through these steps on a call with you. These permission steps follow Microsoft's guidance for using the Power BI Admin APIs. This process needs the following roles to complete:
- Microsoft Entra ID administrator (Microsoft Entra ID was previously called Azure Active Directory)
- Fabric administrator (previously called a Power BI administrator)
1. Create an app registration#
This app registration will act as the service principal that the Argus PBI backend uses to authenticate when interacting with the Power BI APIs in your tenant. This is the entity which will have permissions to call the Power BI APIs in your tenant.
- Navigate to the Azure portal.
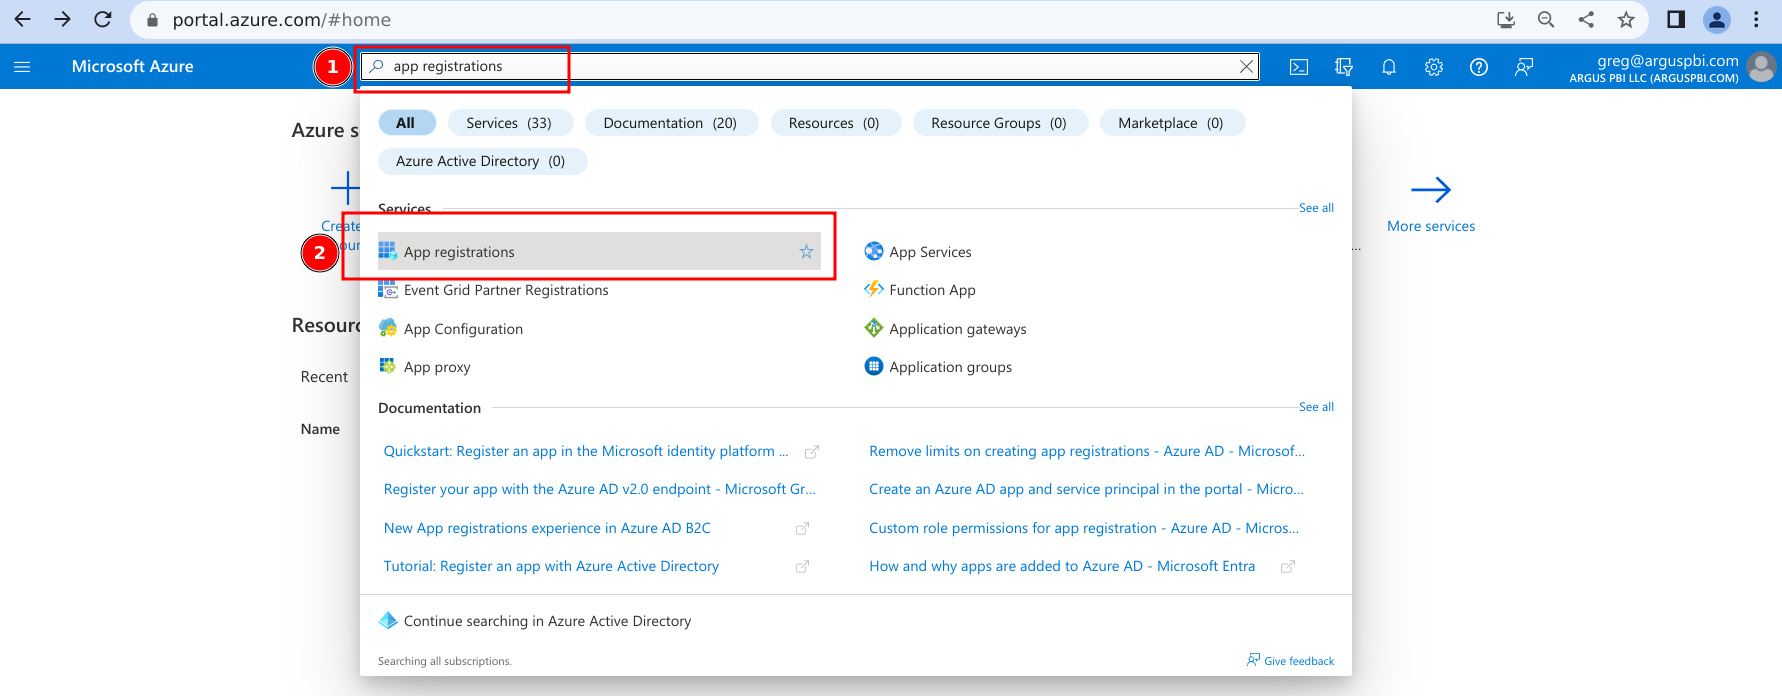
- Search for 'app registrations' and click on the item of the same name.
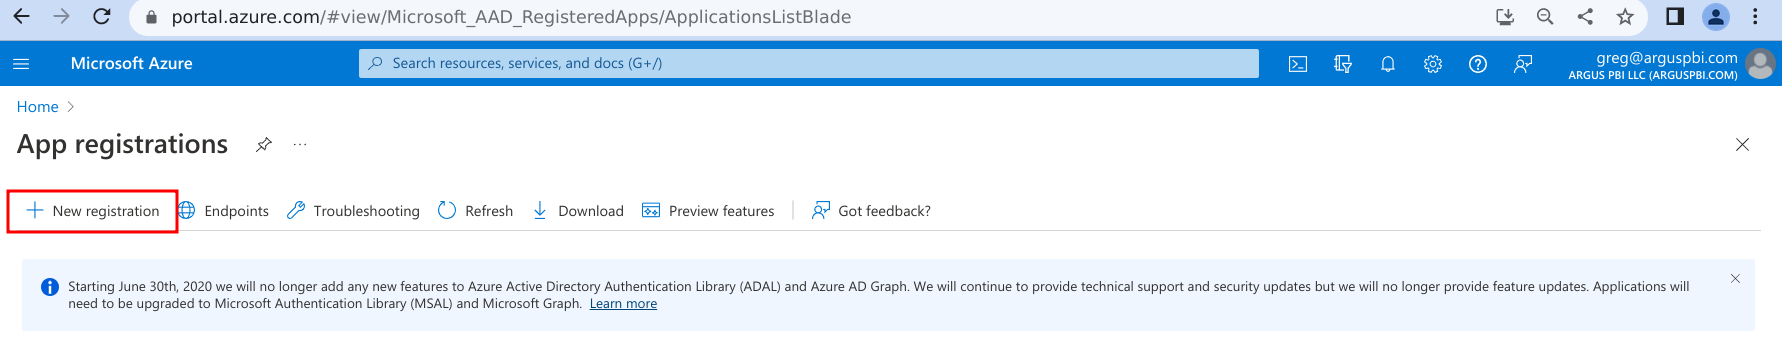
- Select '+ New registration'.
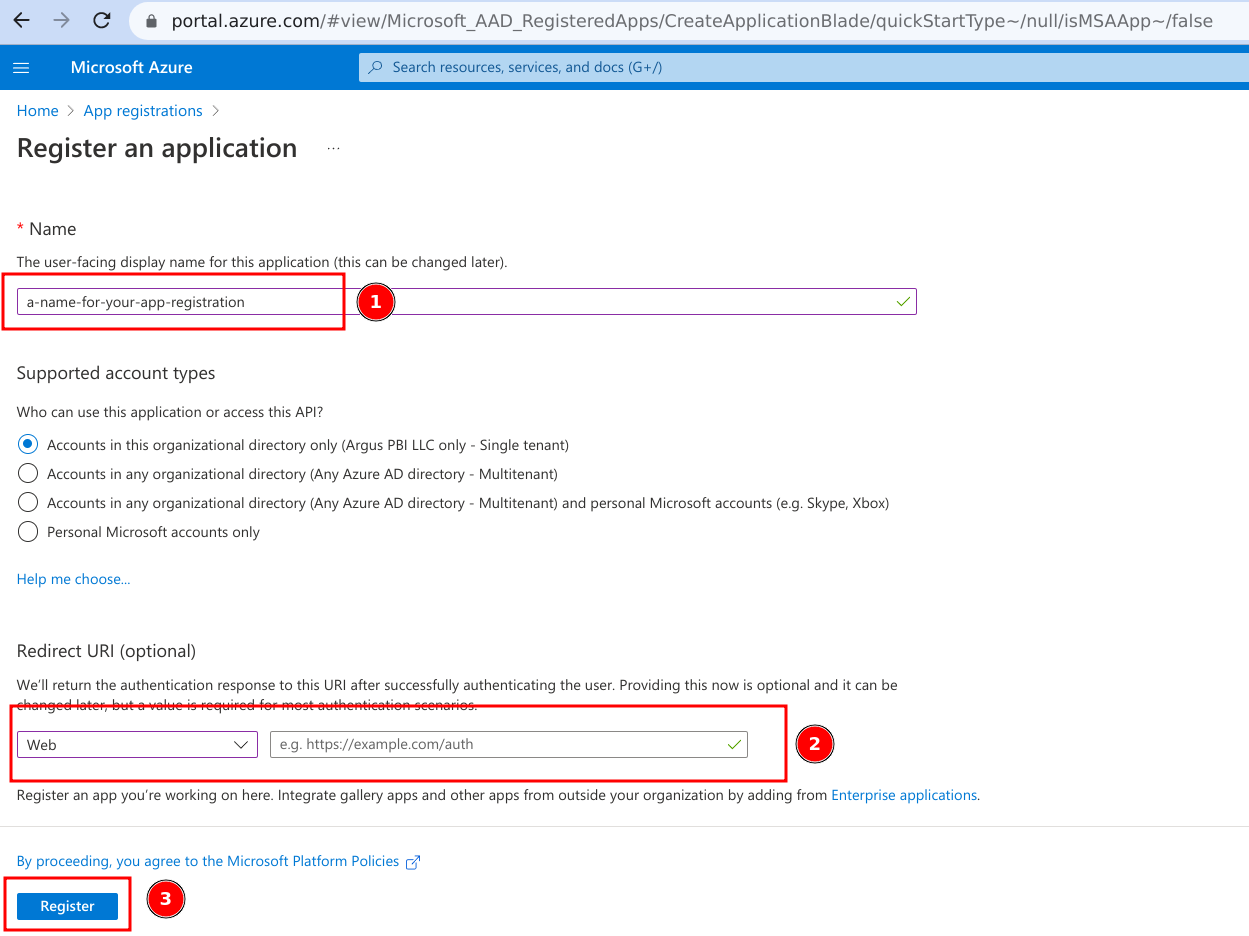
- Provide a name for the app registration -- this value can follow any naming convention you like and is for your own internal management.
- Leave 'Supported account types' at its default of 'Single tenant only'.
- Under 'Redirect URI (optional)', select 'Web' from the 'Select a platform' dropdown and leave the URI field next to it empty.
- Click 'Register'.
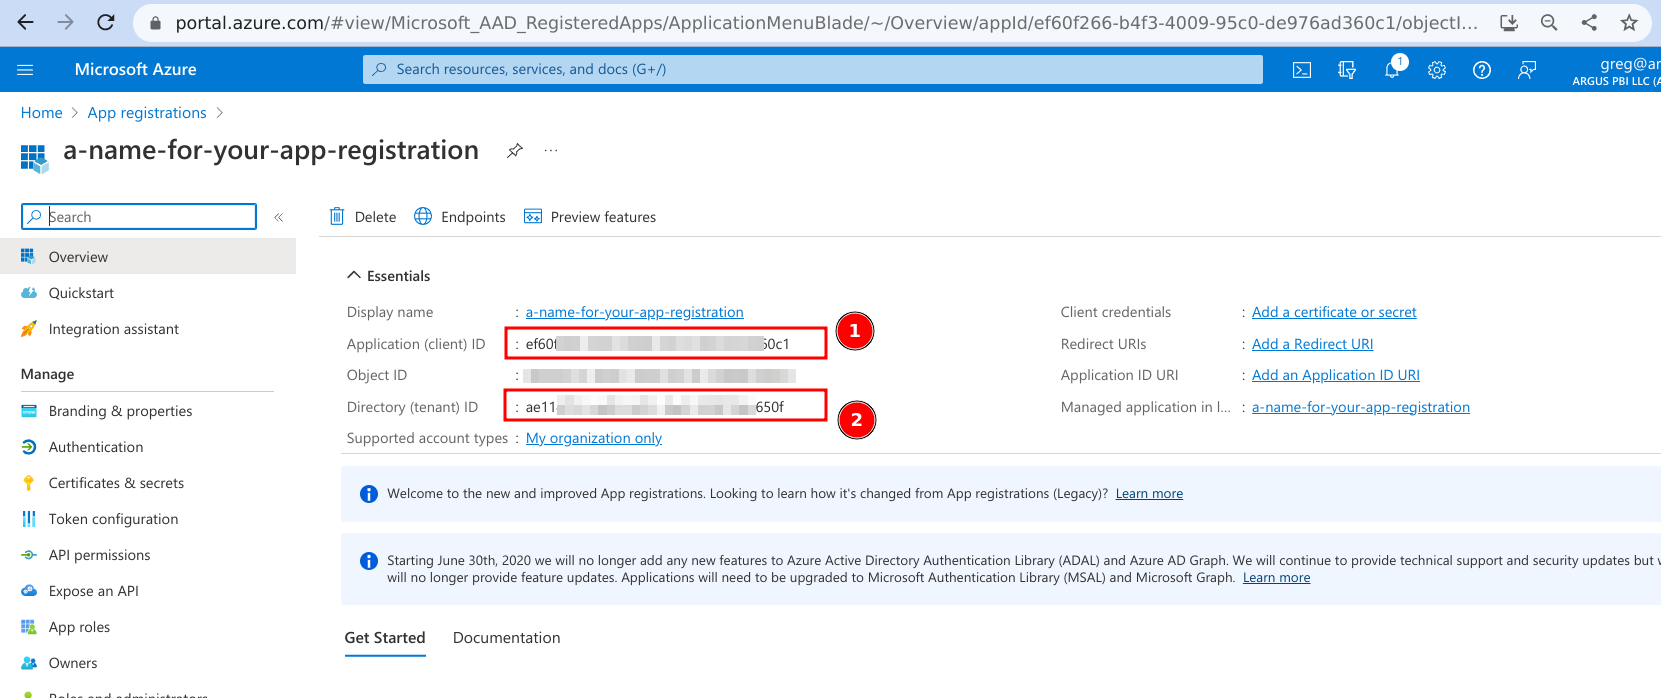
- Capture the Application (client) ID and Directory (tenant) ID.
You will need to provide these to us.
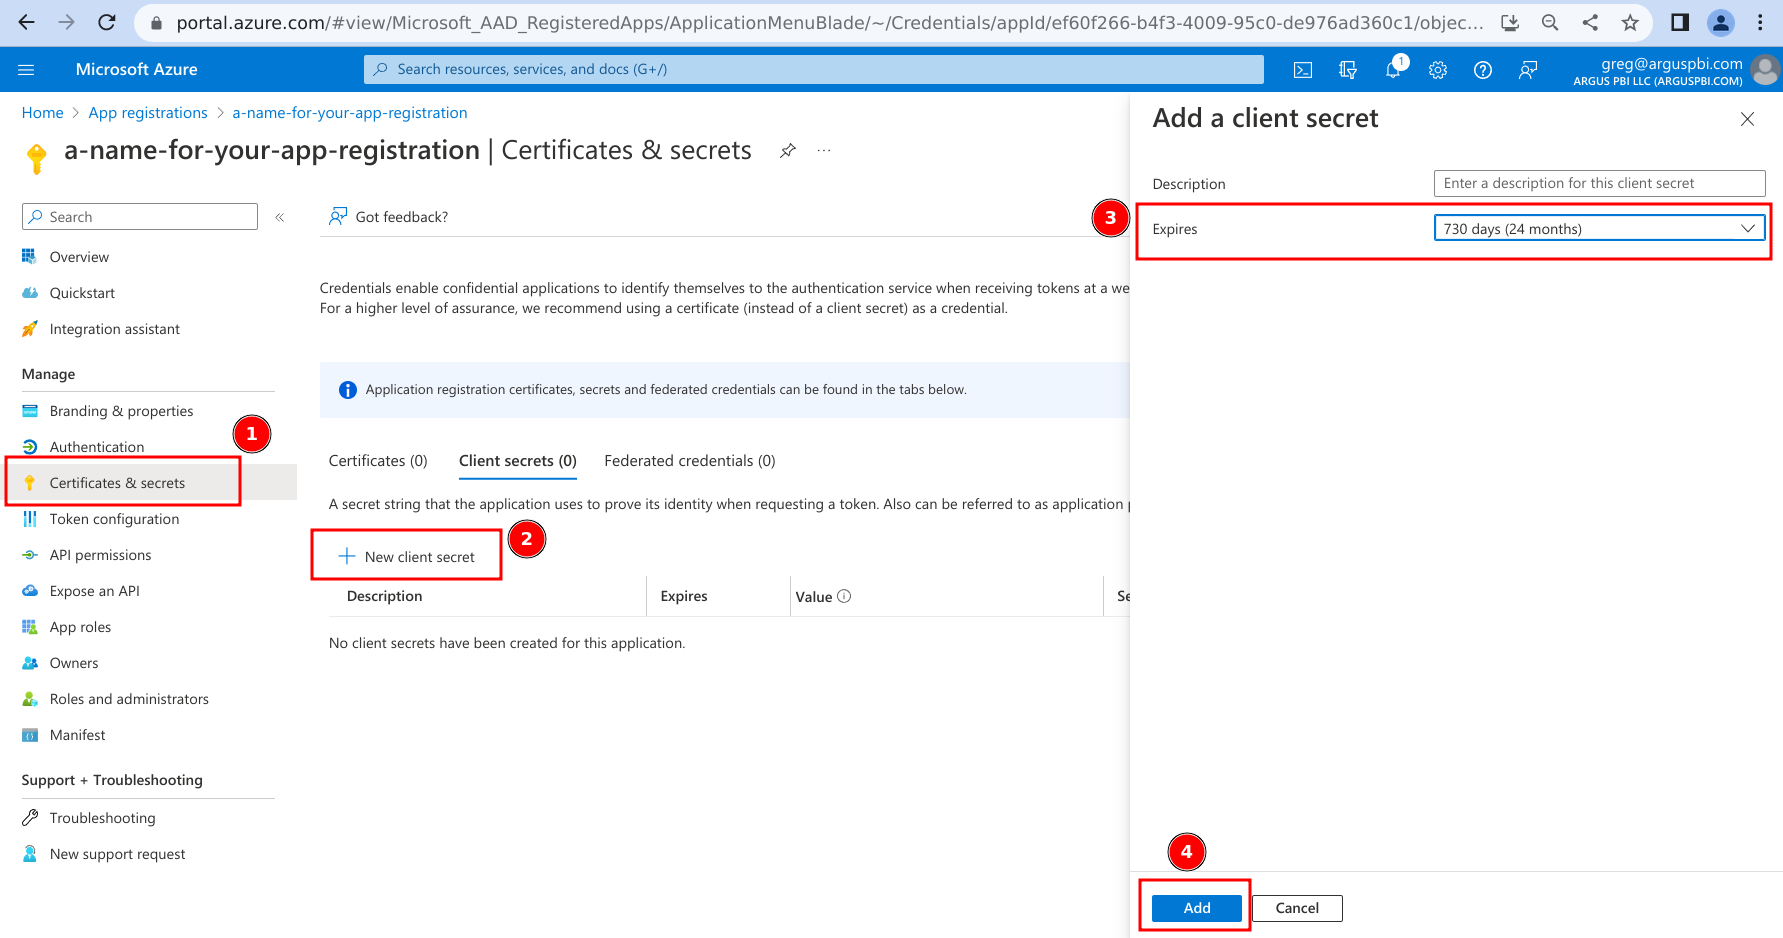
- In the left-hand menu, expand 'Manage' and select 'Certificates & secrets'.
- Click on '+ New client secret'.
- Alter 'Expires' to be '730 days (24 months)'.
The dropdown defaults to 'Recommended: 180 days (6 months)', so this must be changed.
- Optionally, you can provide a description here which will be displayed in the Azure portal, but is not used anywhere else.
- Optionally, you can provide a description here which will be displayed in the Azure portal, but is not used anywhere else.
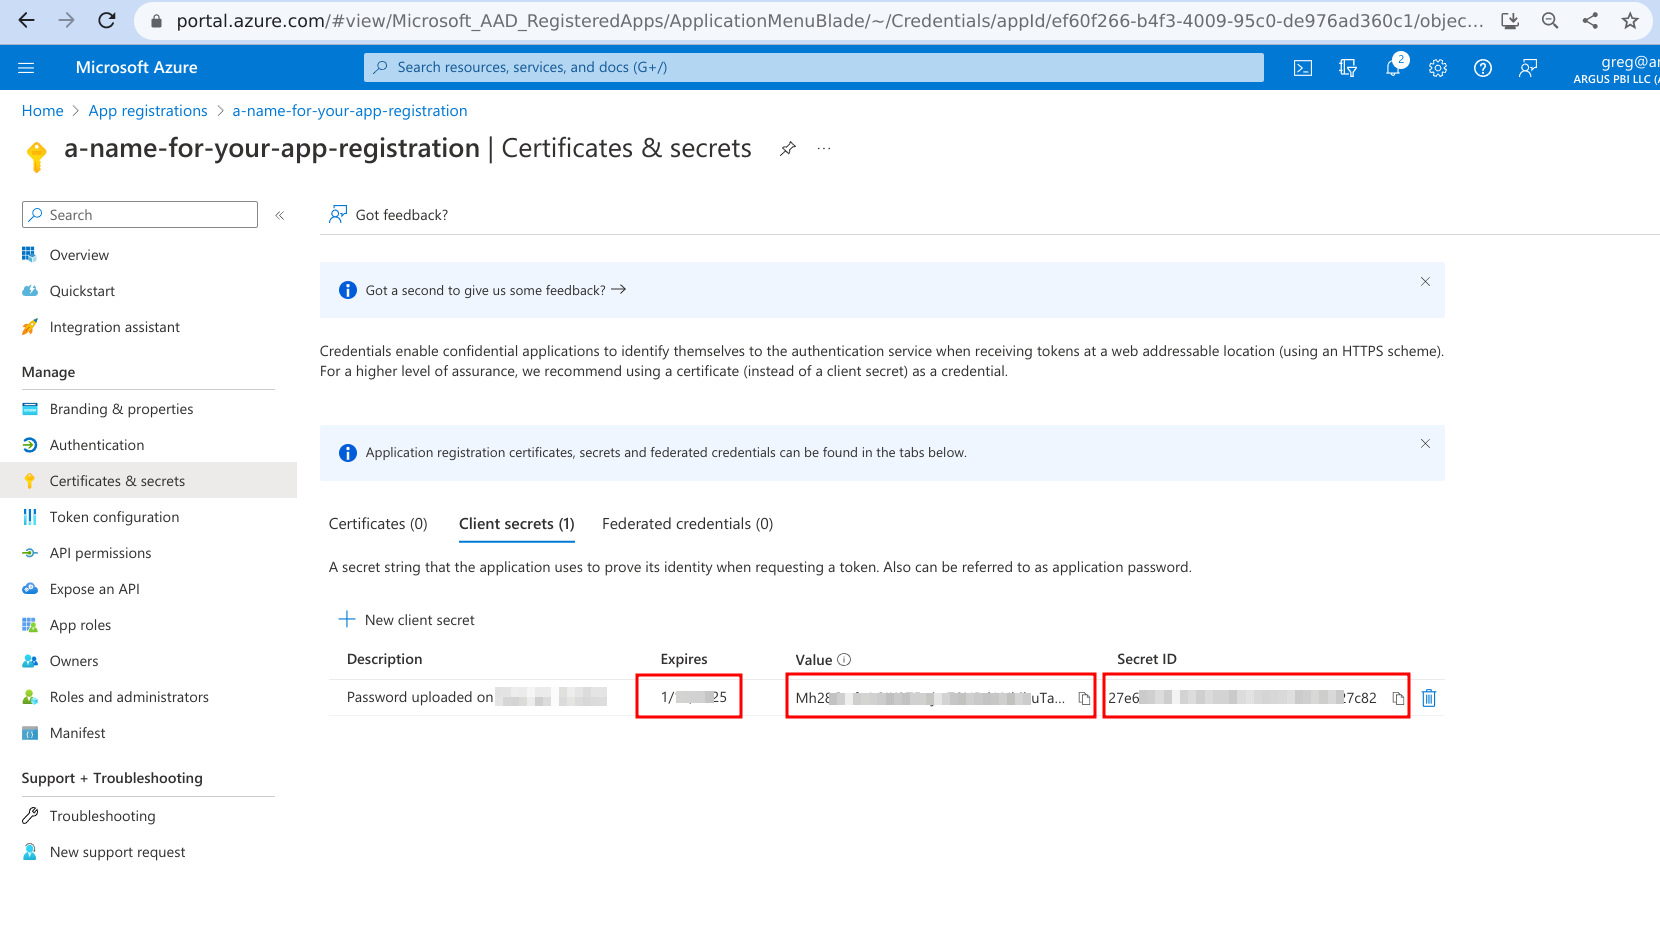
- Capture the fields 'Expires', 'Value', and 'Secret ID'. You will need to provide these to us.
Note that the 'Value' will not be visible after you refresh your browser or navigate to another page.
The 'Value' is equivalent to a password, so keep it secret and keep it safe.
In the next section we describe how you can securely share this information with us.
You can use the small copy icons next to 'Value' and 'Secret ID' to copy these values if they do not display in full on your browser.
2. Share App Registration details with Argus PBI#
Contact Argus PBI support to share the App Registration details. These are the items from steps 8 and 12 above. Do not email the values directly, as these are credentials which allow all API access that Argus PBI will use. When you send the email, simply let us know that you have created the app registration and we will provide a link where you can securely provide the App Registration details. The only person who will be able to access this link will be the person who sends the email, so please have the person who created the app registration and captured its details email us.
3. Create a Security Group and add the App Registration as a member#
Most customers prefer to create a Security Group specifically for this purpose, but you may use any existing Security Group if you prefer. Any members of this security group will be given permissions to call the Power BI Admin APIs in the next configuration step. If you are using a pre-existing Security Group, please go to the section, Alternative to Step 3: an existing Security Group to add the App Registration created above to the security group.
- Navigate to the Azure portal.
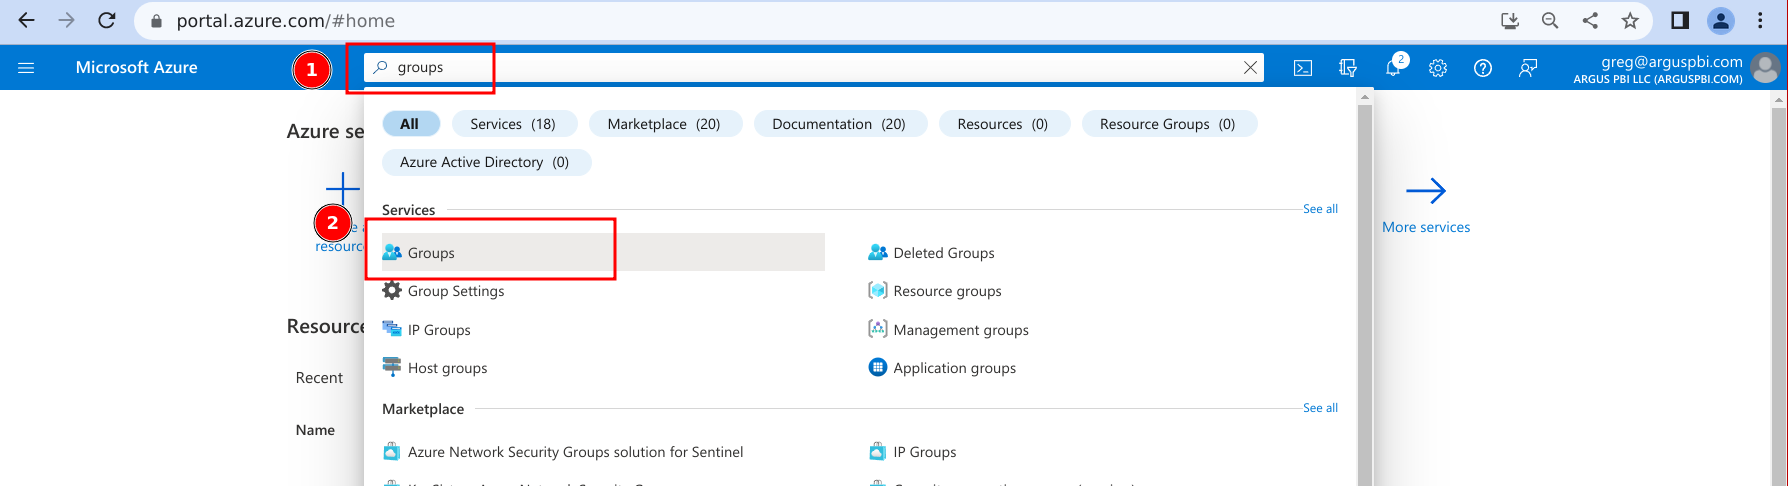
- Search for 'groups' and click on the item of the same name. This opens the 'Groups | Overview' page.
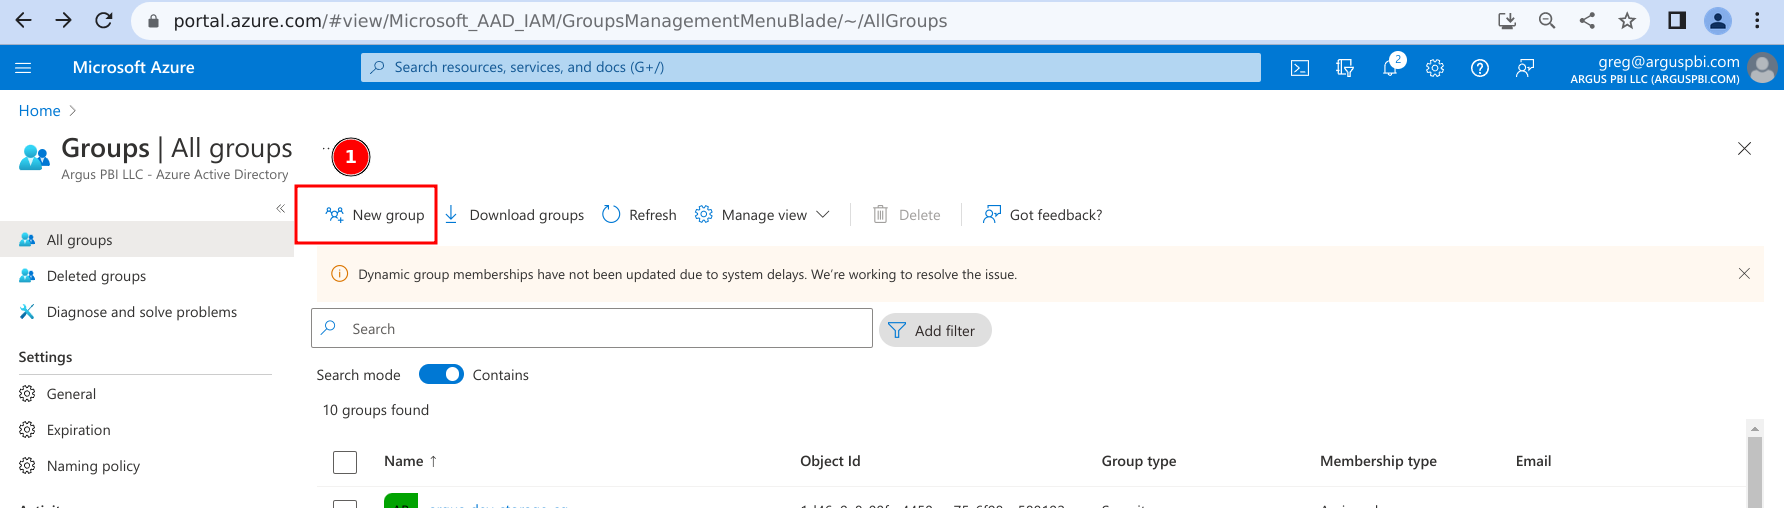
- Click on 'New group'.
- Leave 'Group type' at its default of 'Security' and provide a name for the security group.
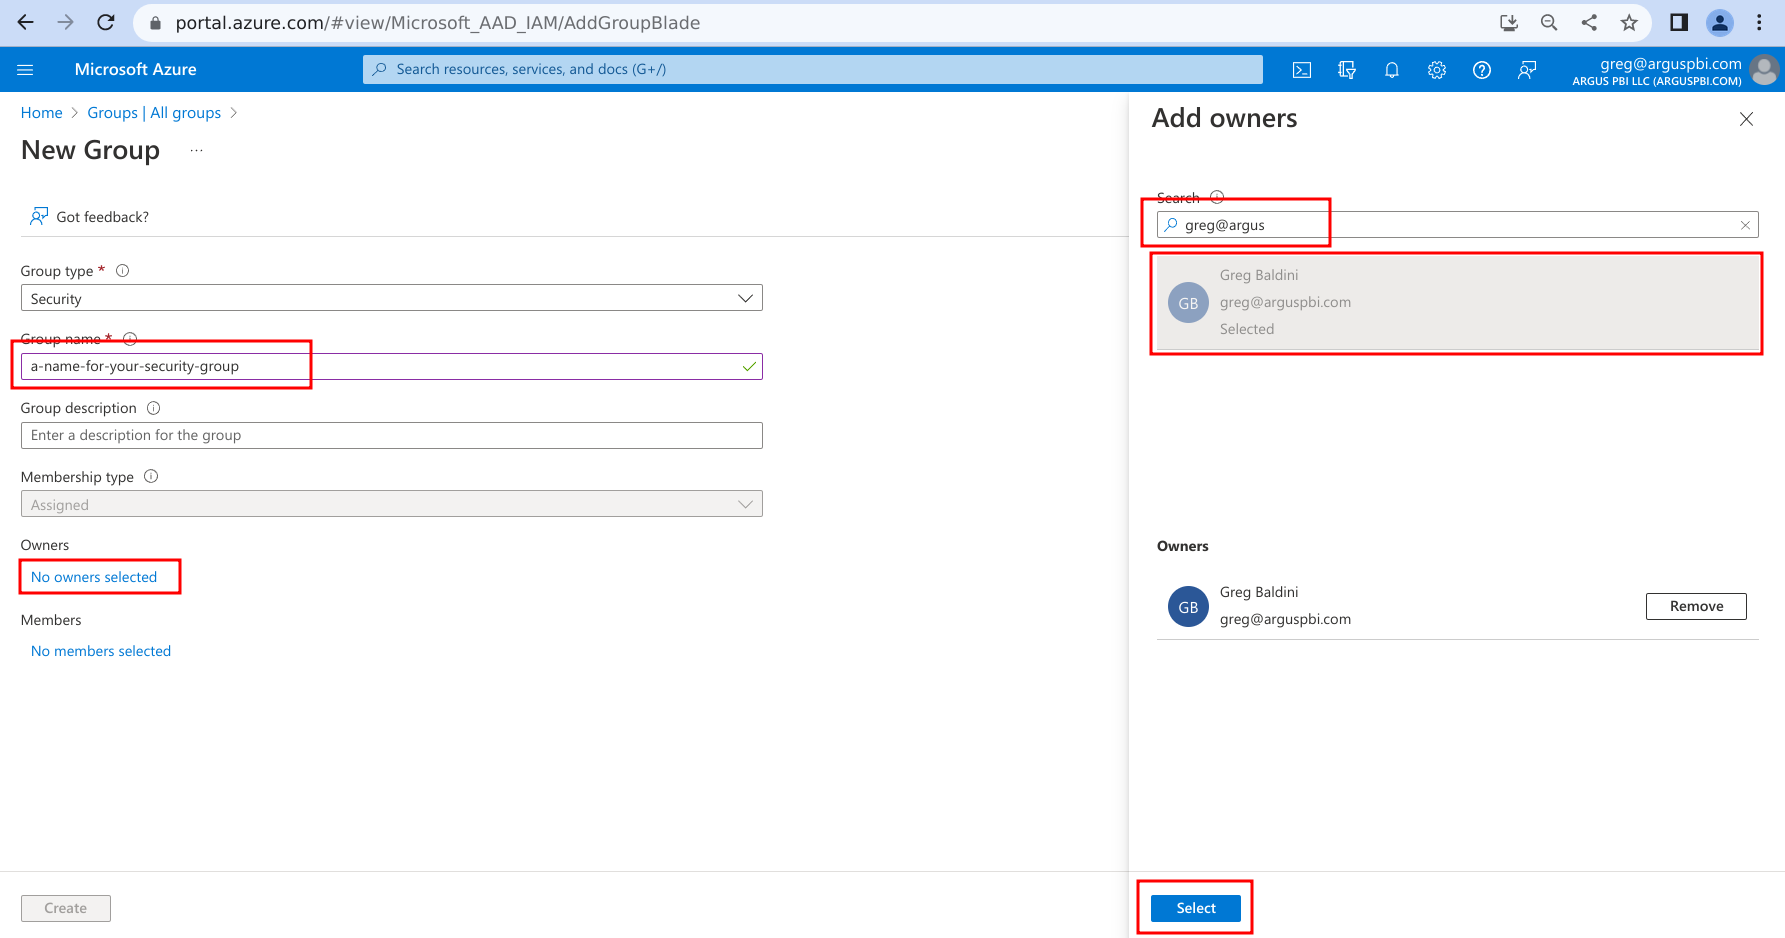
- Add an owner to the security group:
- Click on 'No owners selected'
- Search for the user name you want to be the owner
- Click on the user's name
- Click on 'Select'
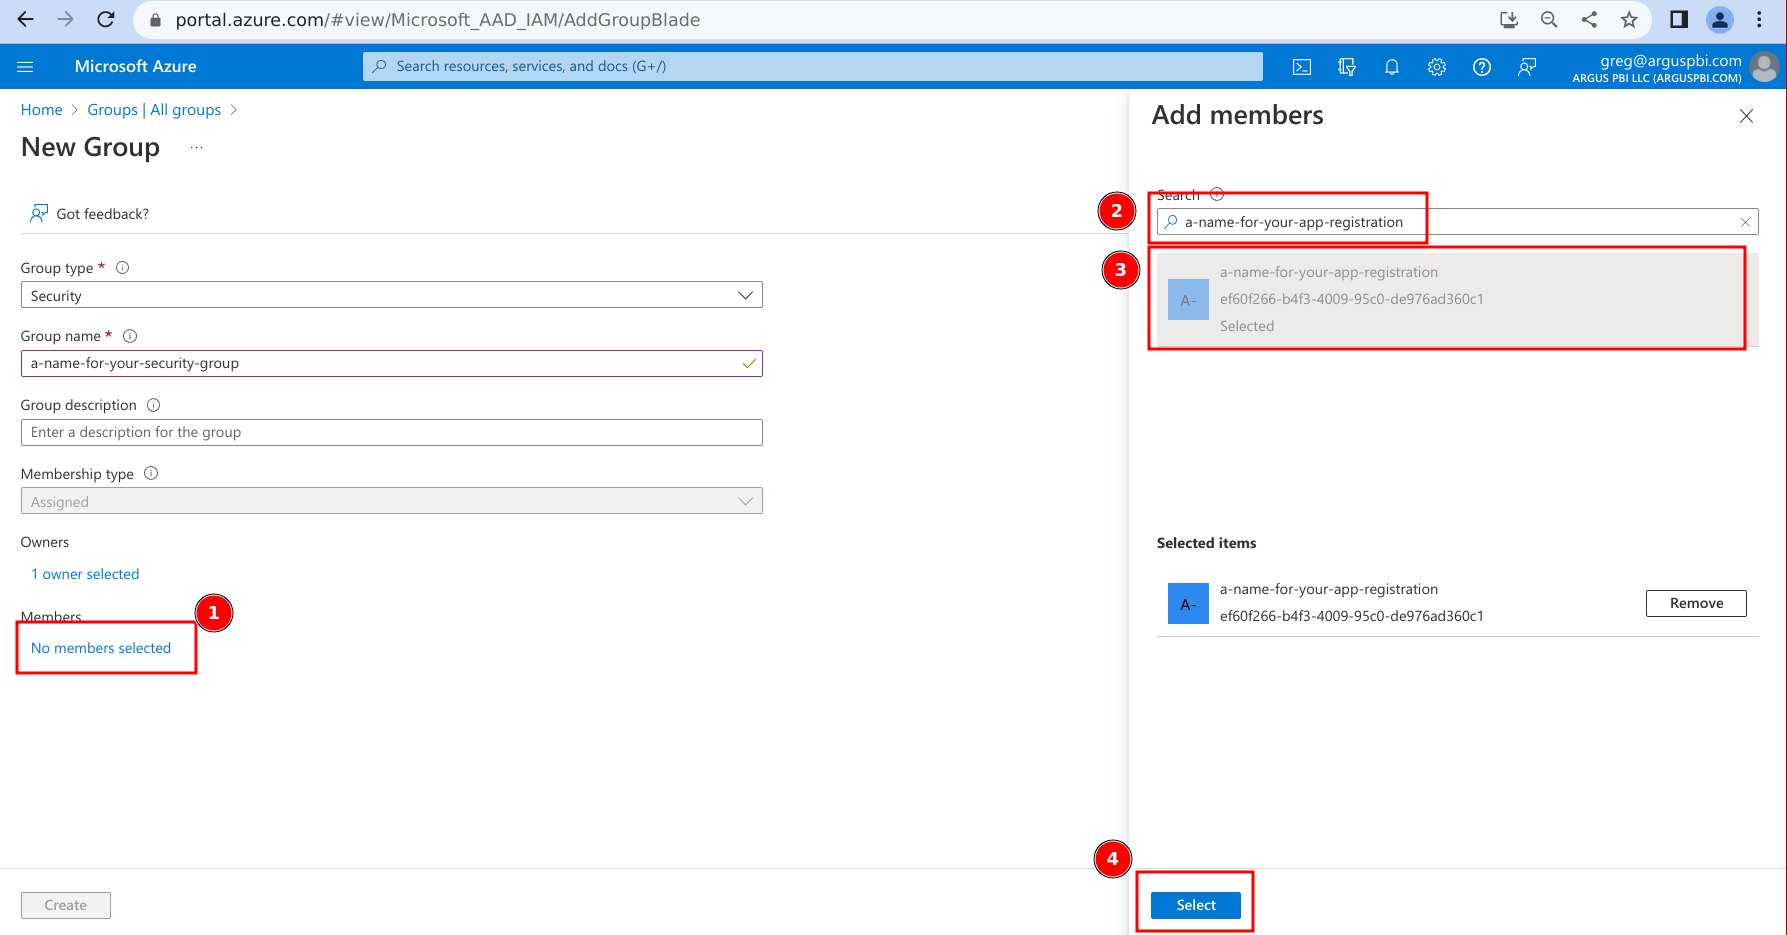
- Add the App Registration as a member of the group:
- Click on 'No members selected'
- Search for the App Registration name you created above
- Click on the App Registration's name -- it will be listed with a type of 'Enterprise application'
- Click on 'Select'
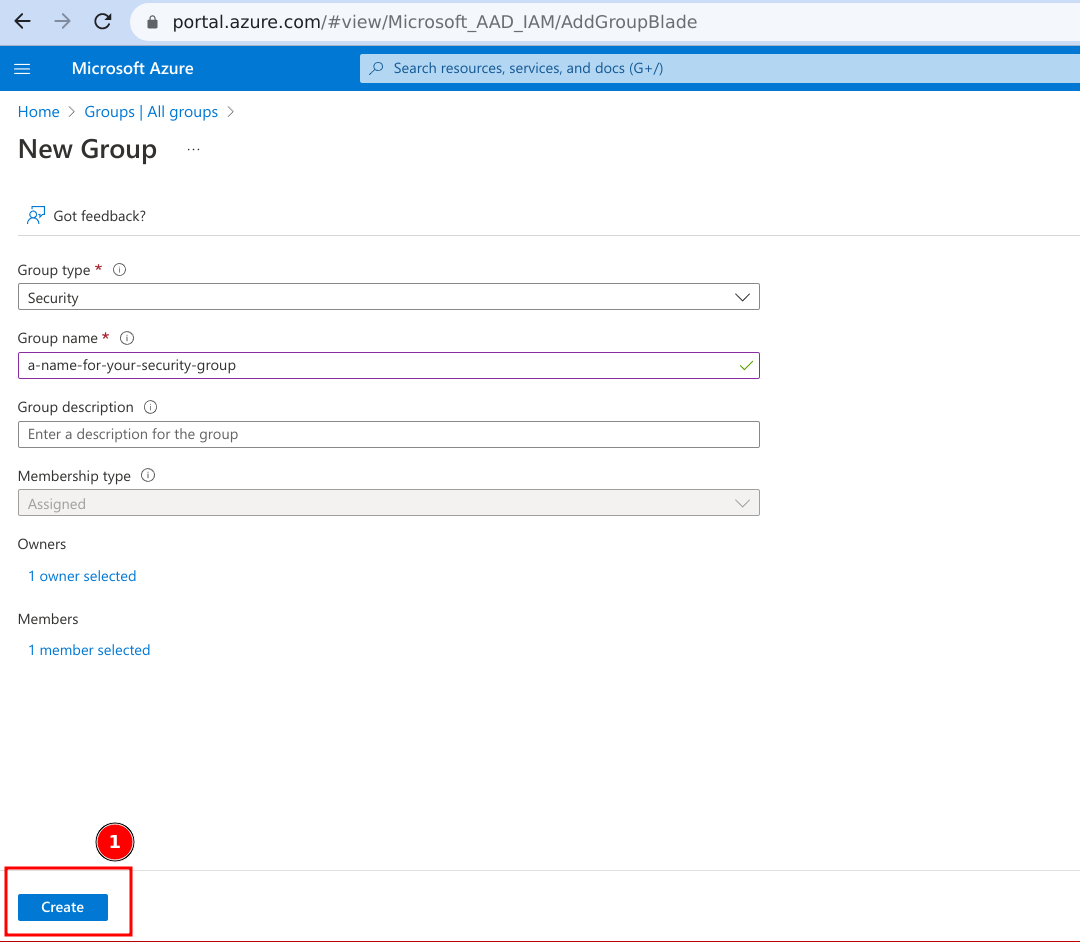
- Click on 'Create'.
Alternative to Step 3: an existing Security Group#
If you would prefer to use an existing Security Group, you can. Note that in the next section, the Security Group will be given permissions to use Power BI's Admin APIs.
- Navigate to the Azure portal.
- Search for 'groups' and click on the item of the same name.
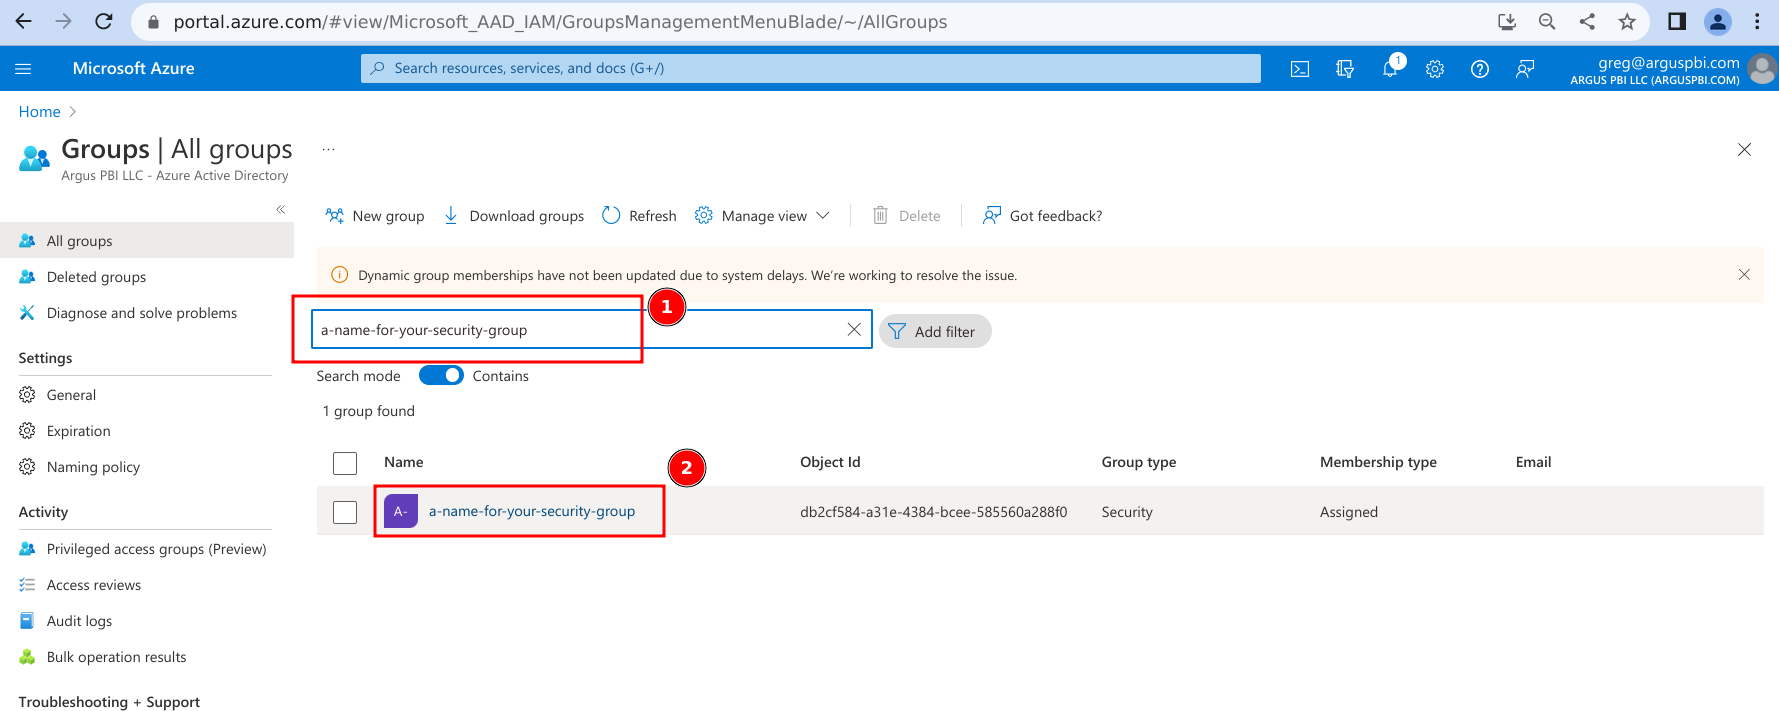
- Click on 'All groups', then search for the Security Group you would like to use and click on its name.
- In the left-hand menu, expand 'Manage' and click on 'Members'.
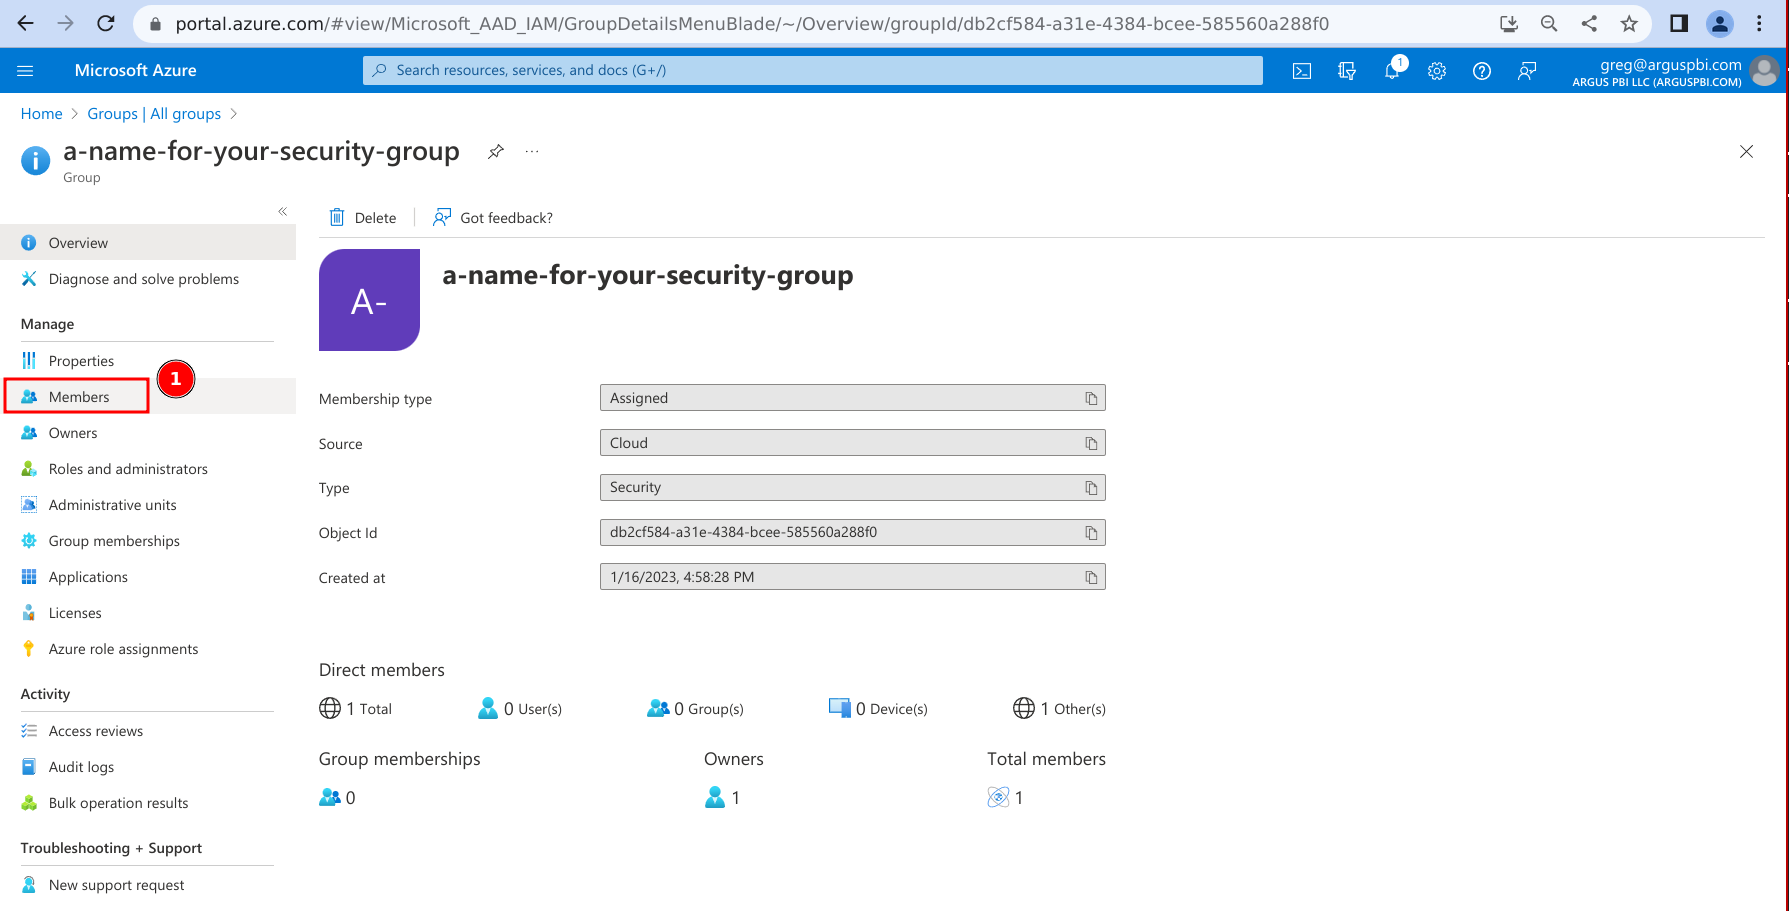
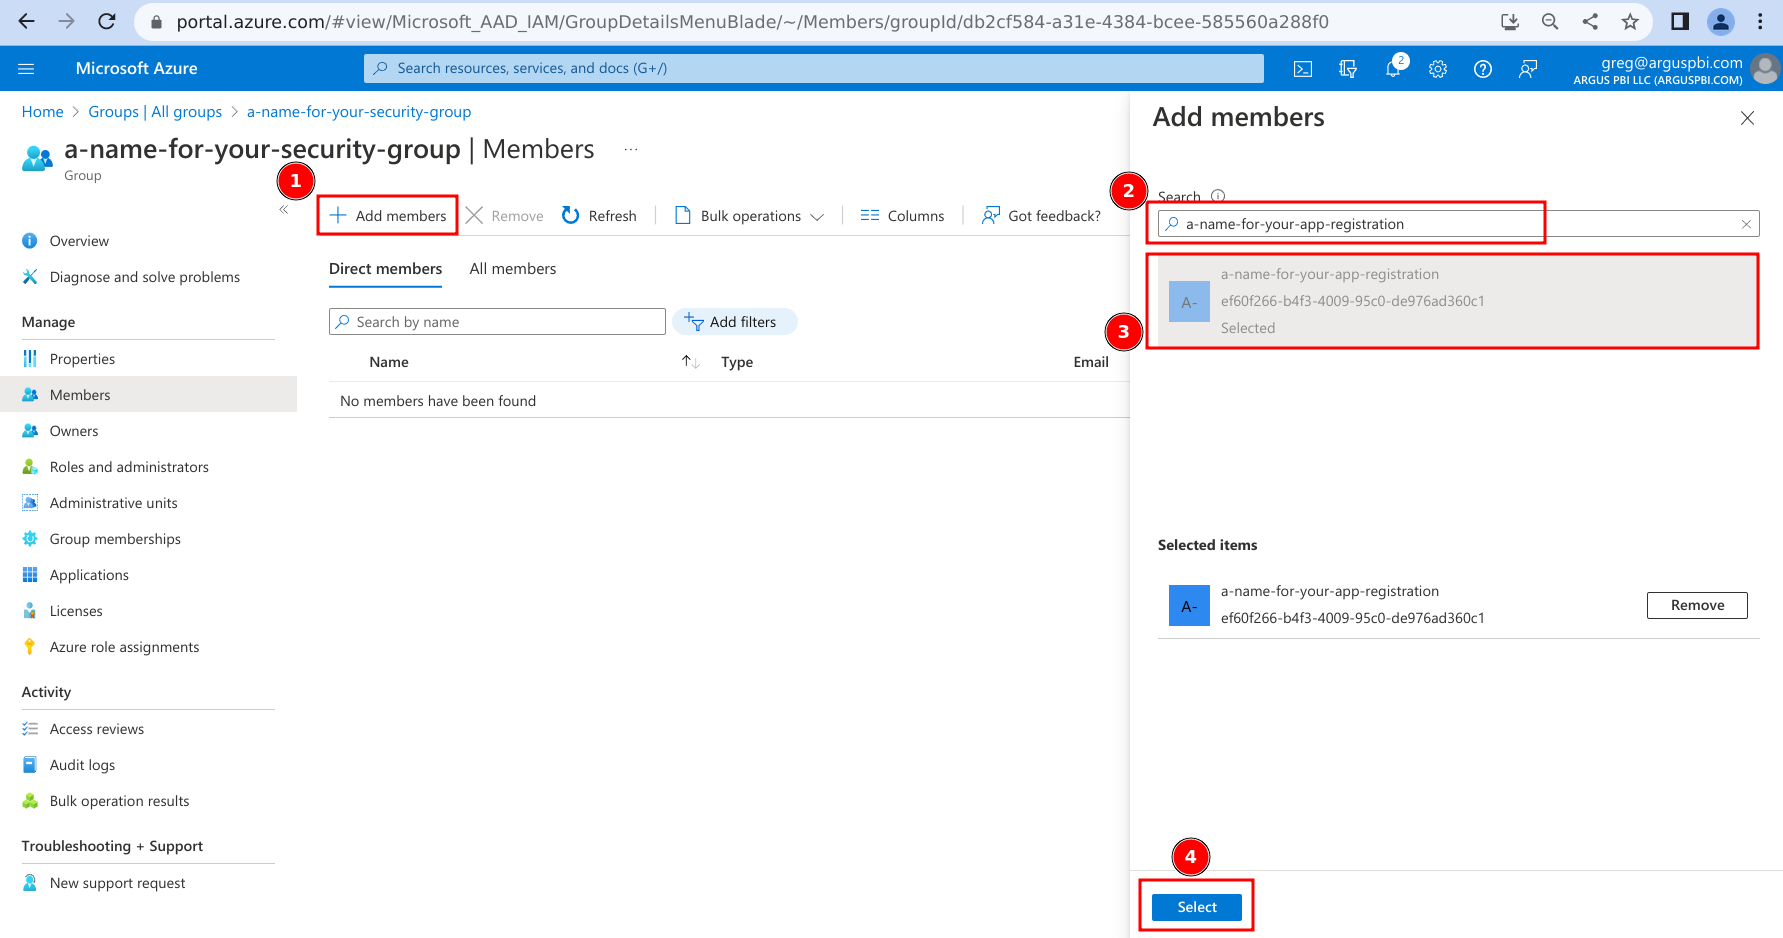
- Add your App Registration as a member of the Security Group:
- Click 'Add members'.
- Search for your App Registration's name.
- Click on your App Registration -- it will be listed with a type of 'Enterprise application'.
- Click on 'Select'
4. Configure Fabric admin permissions#
In this section, we configure permissions for the App Registration (via the Security Group it belongs to) to be able to call Power BI's Admin APIs. These settings live in the Fabric admin portal, which was previously called the Power BI Admin portal.
- Navigate to the Fabric admin portal tenant settings.
You can also reach it from the settings menu in the top-right of the Fabric or Power BI service.
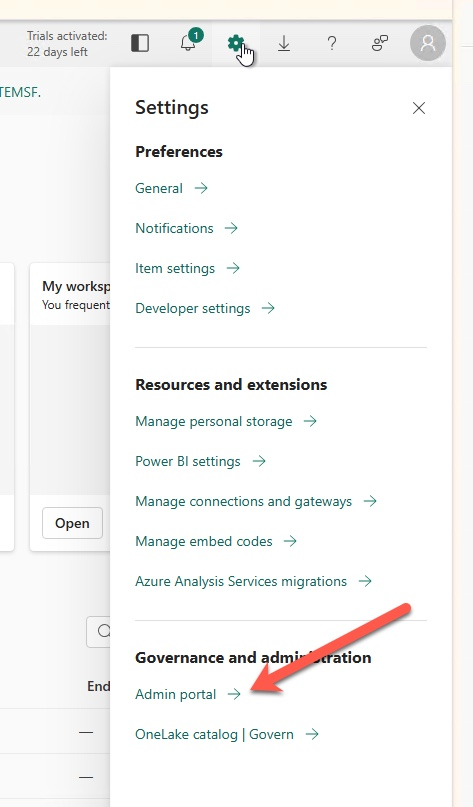
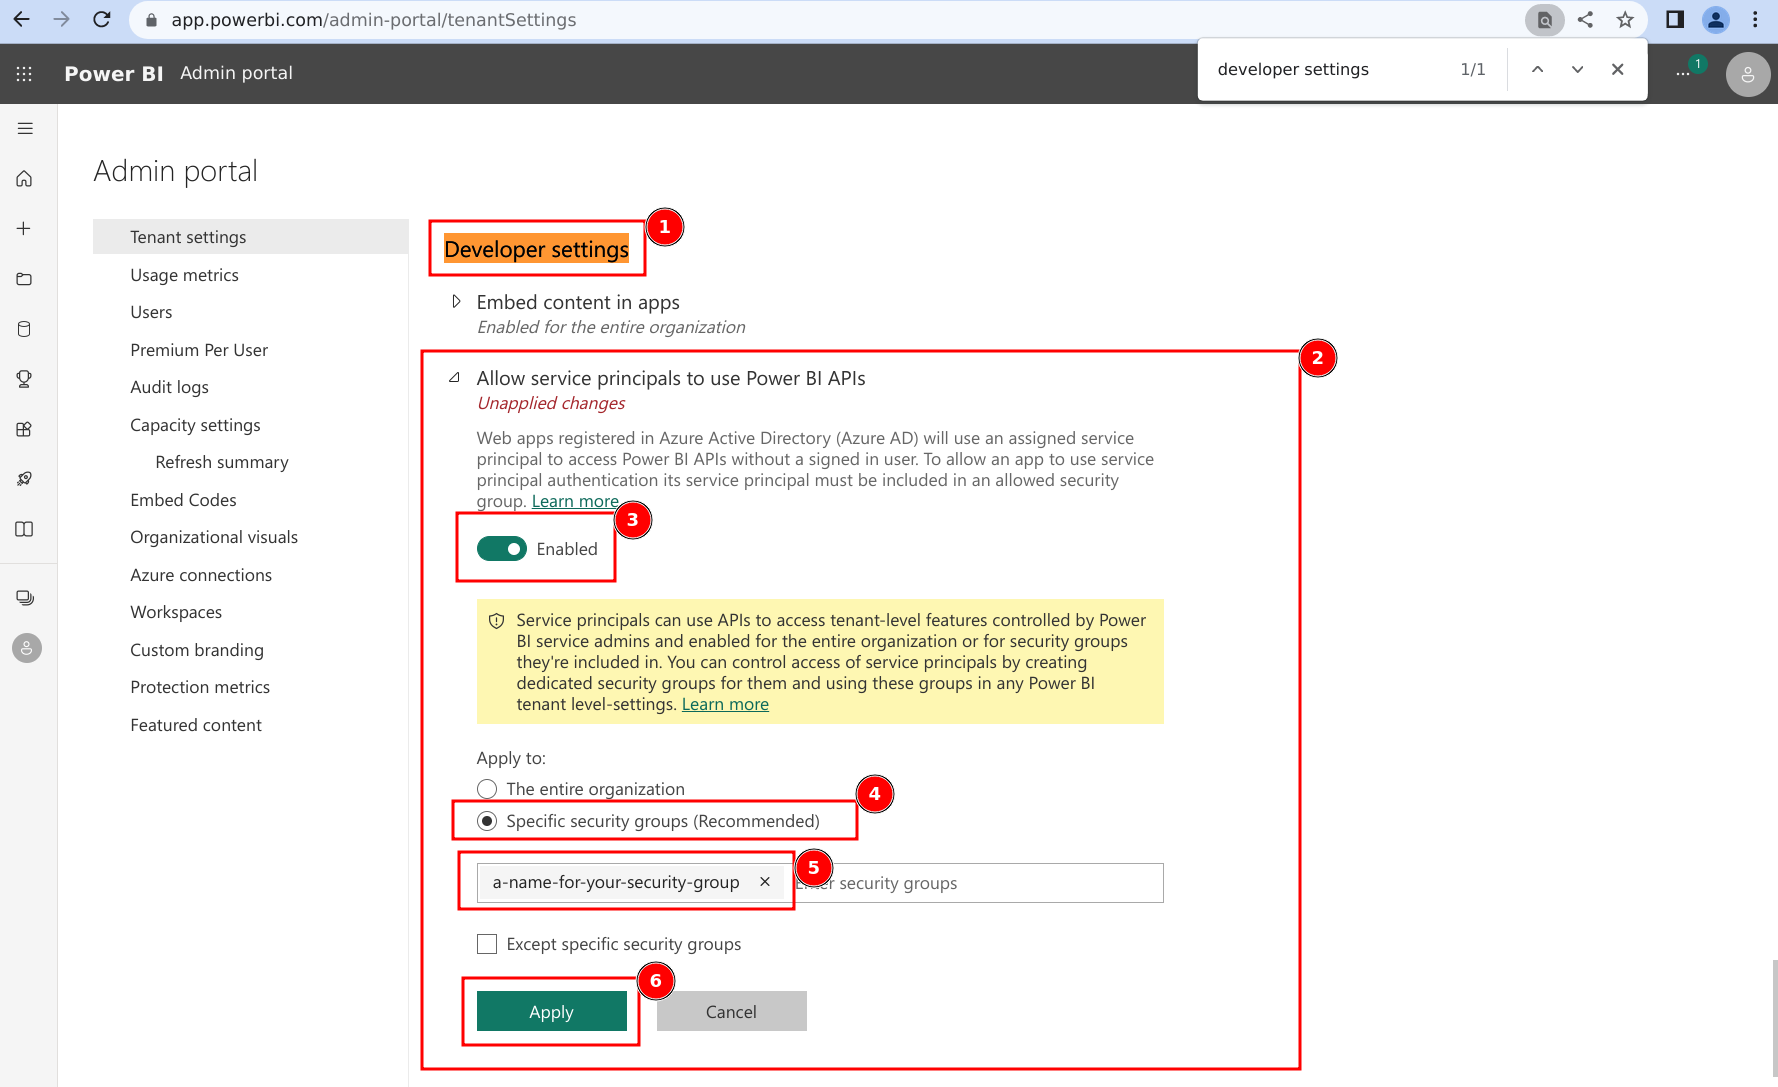
- Scroll (or search in the page) until you find 'Developer settings'.
- Expand the subsection for 'Service principals can call Fabric public APIs'.
- Ensure that the setting is toggled to Enabled.
- Click on the radio selection for 'Specific security groups (Recommended)'.
- Add the Security Group configured above to the allowed list.
- Click on 'Apply'.
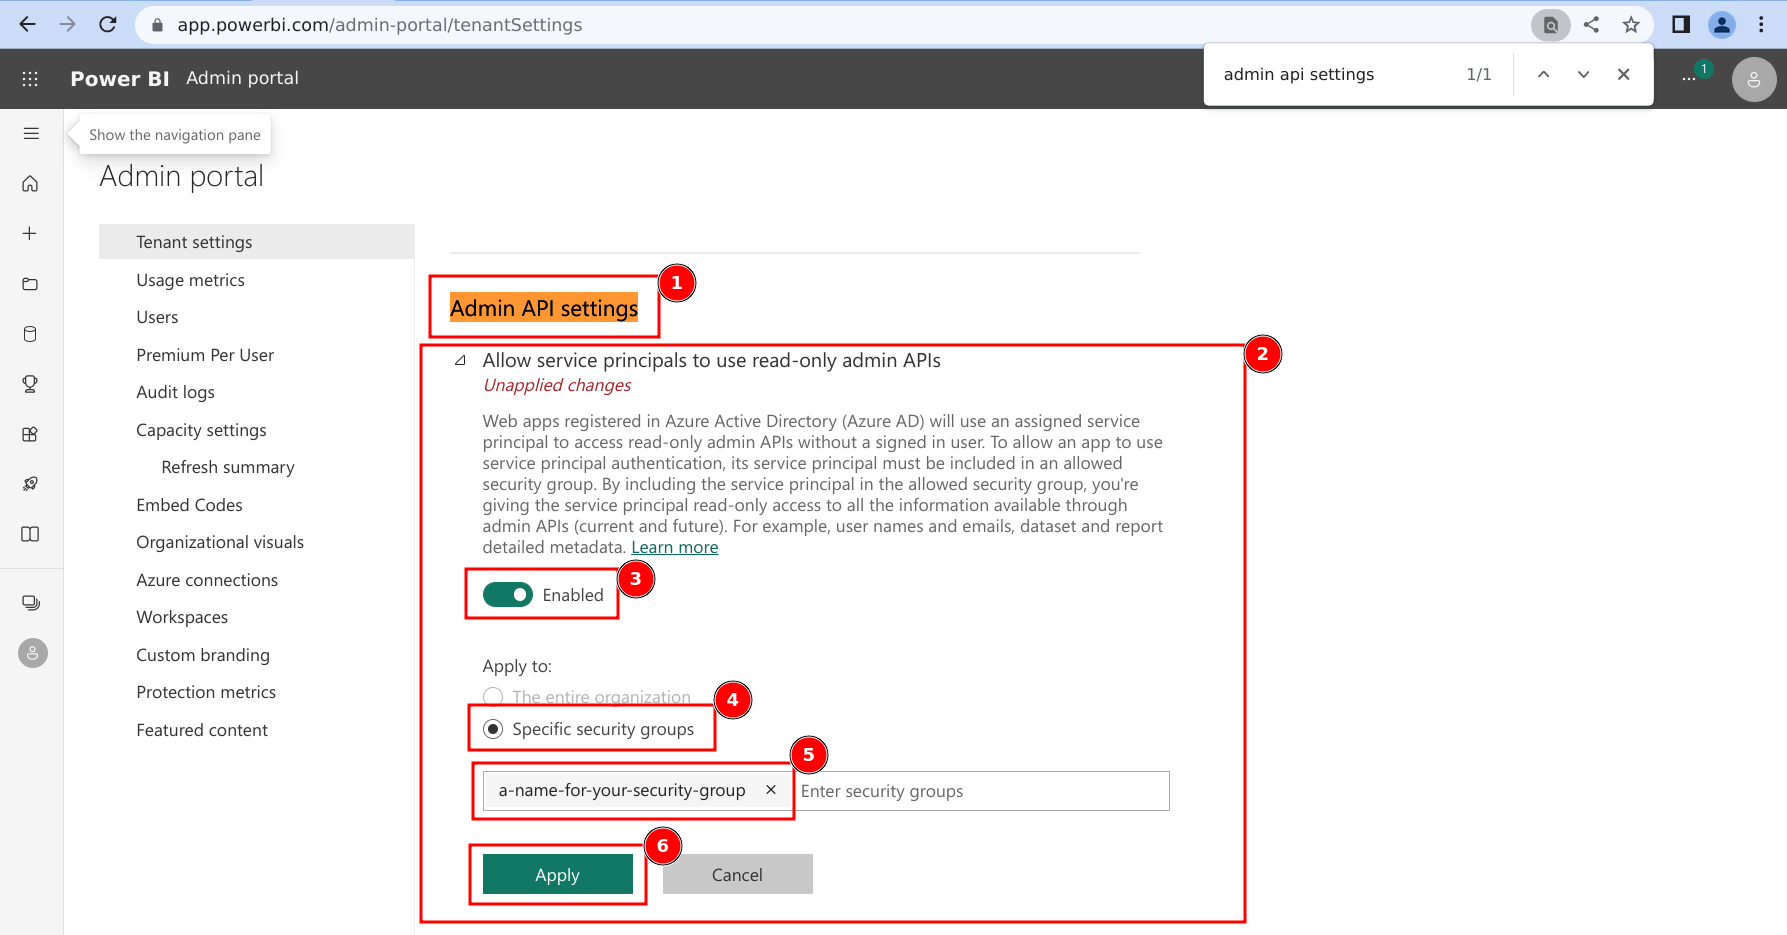
- Scroll (or search in the page) until you find 'Admin API settings'.
- Expand the subsection for 'Service principals can access read-only admin APIs'.
- Ensure the setting is toggled to Enabled.
- Click on the radio selection for 'Specific security groups'.
- Add the Security Group configured above to the allowed list.
- Click on 'Apply'.
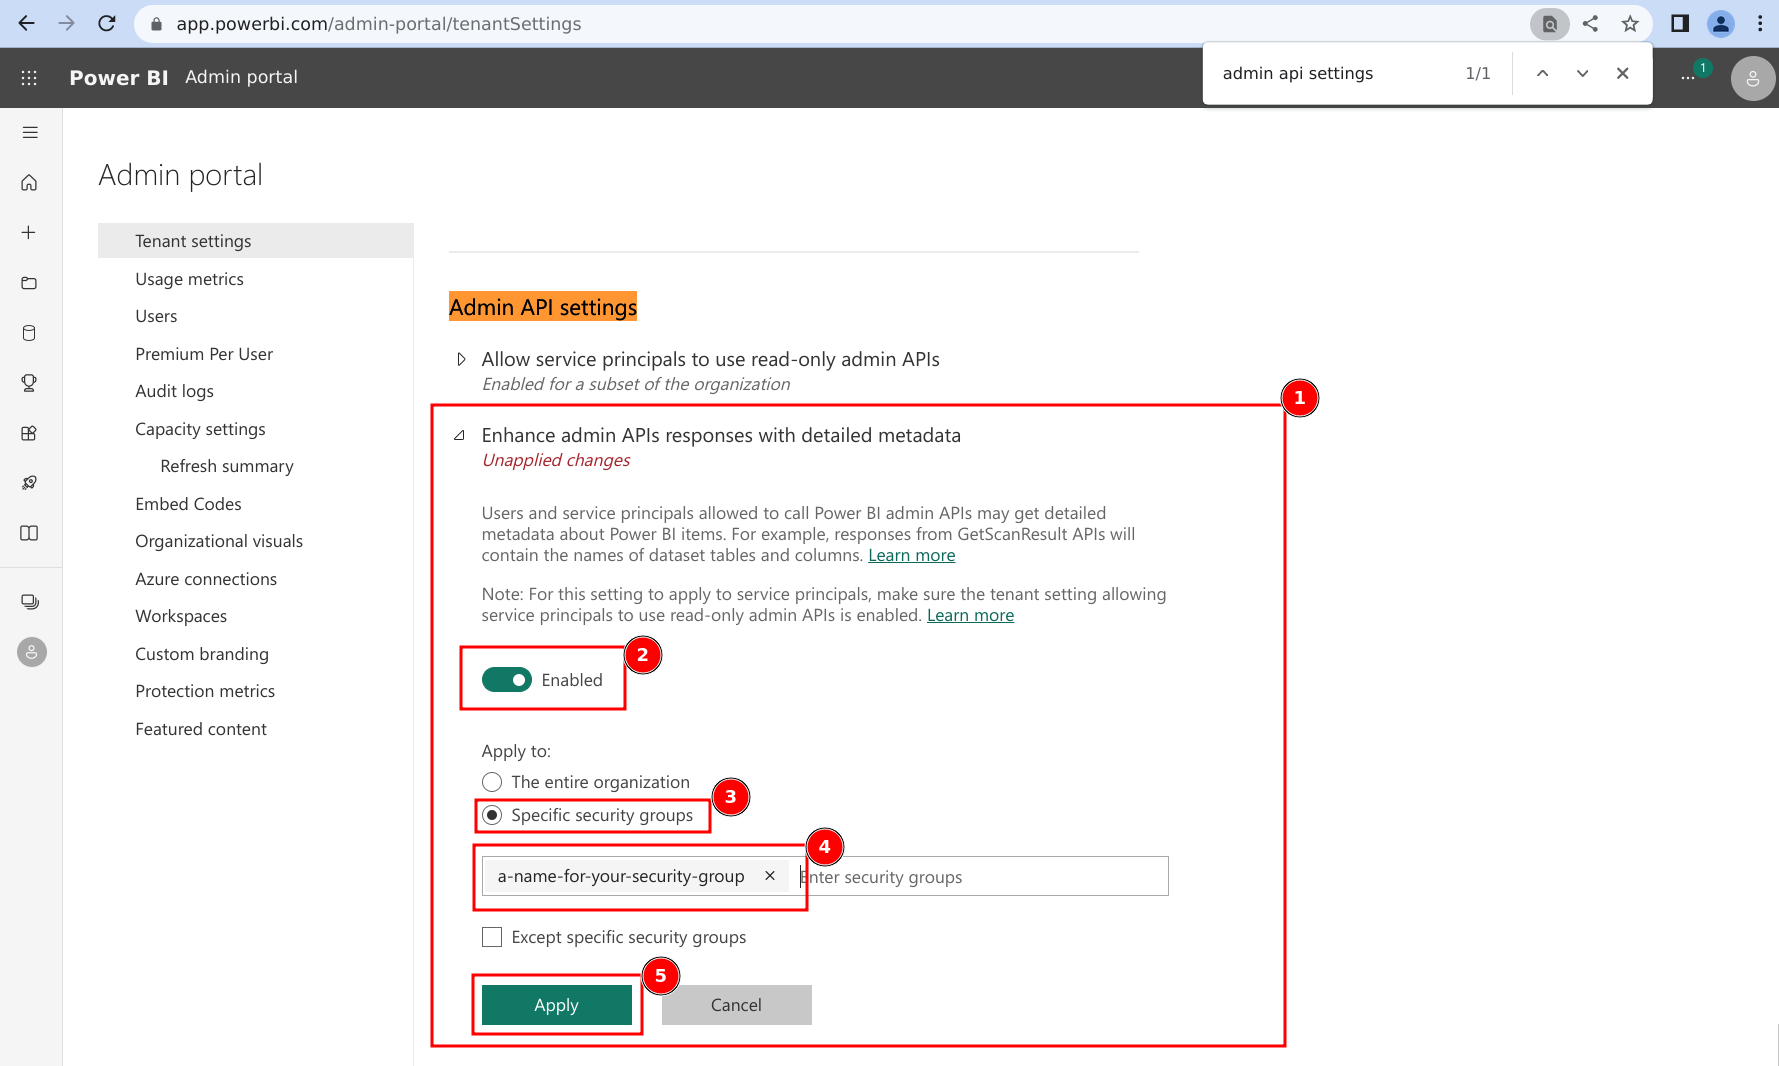
- Expand the subsection for 'Enhance admin APIs responses with detailed metadata'.
- Ensure the setting is toggled to Enabled.
- Click on the radio selection for 'Specific security groups'.
- Add the Security Group configured above to the allowed list.
- Click on 'Apply'.
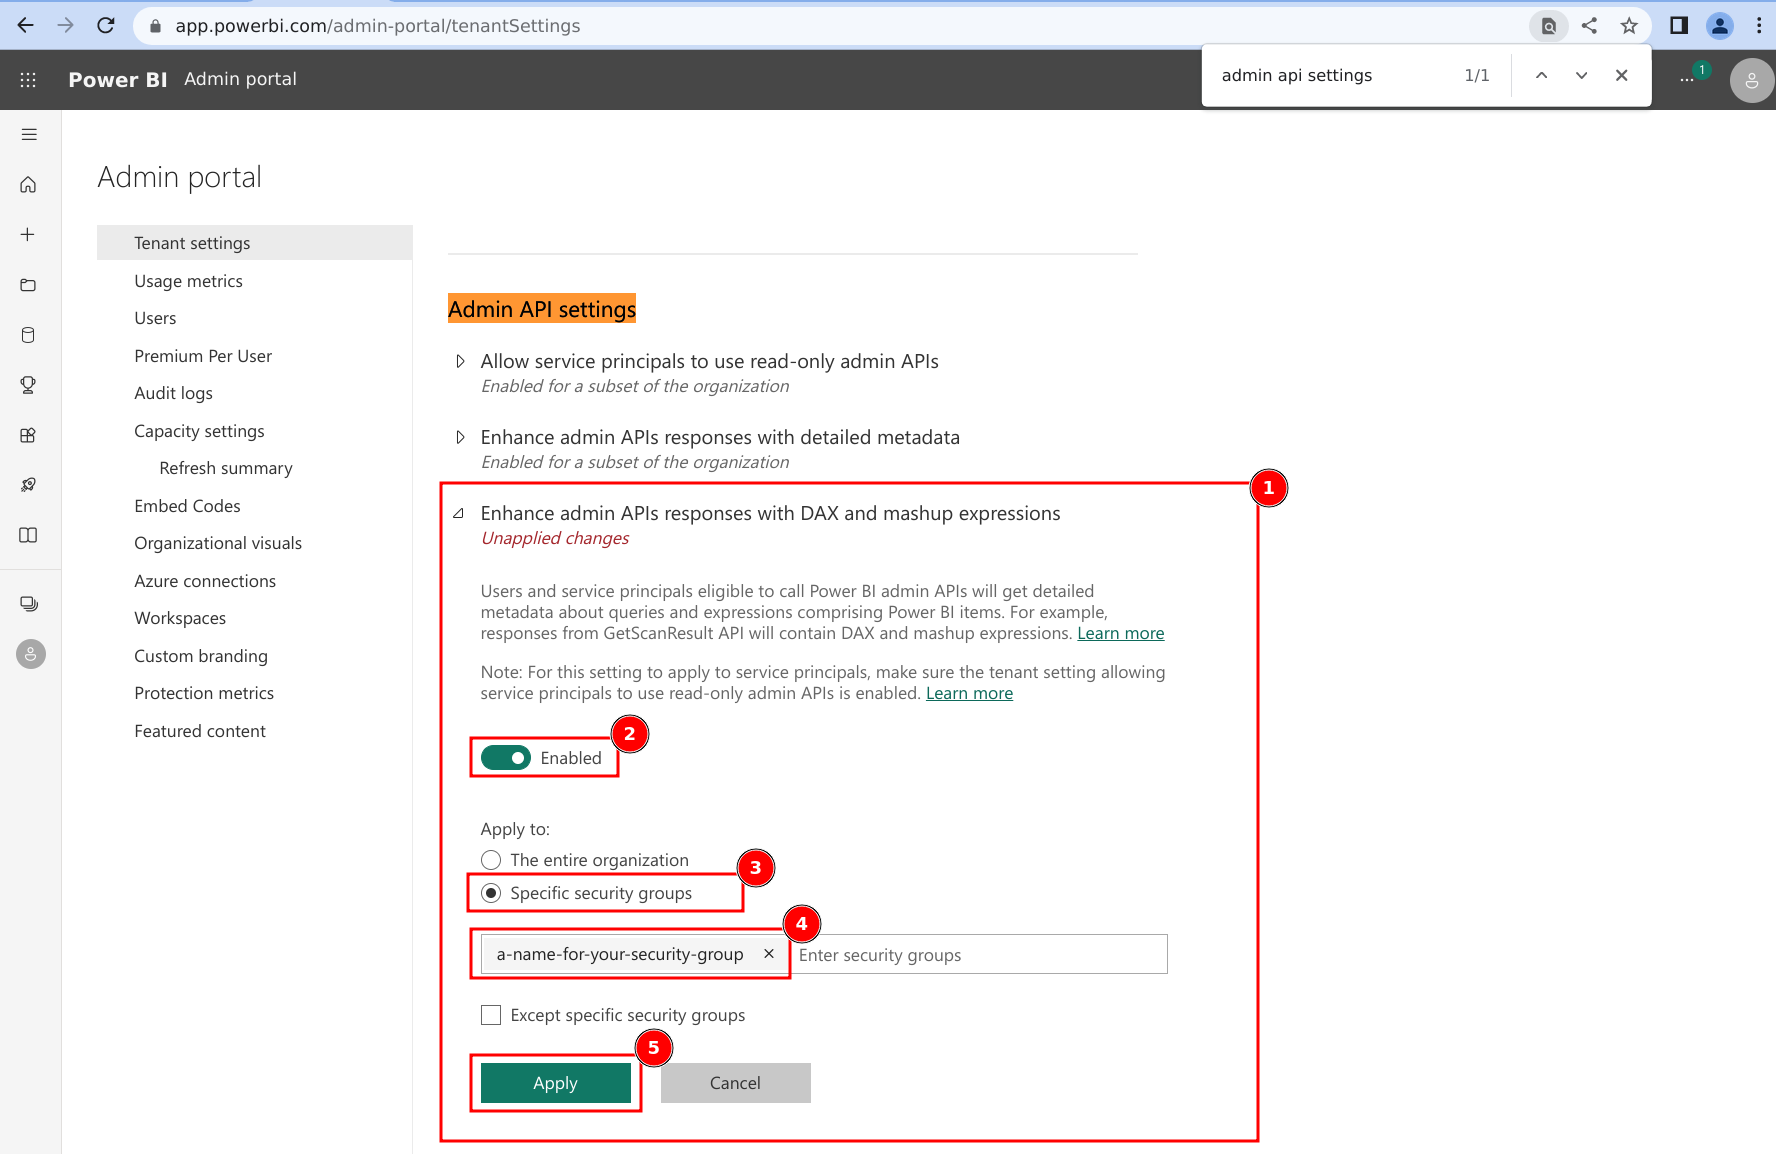
- Expand the subsection for 'Enhance admin APIs responses with DAX and mashup expressions'. This setting can only be enabled if 'Enhance admin APIs responses with detailed metadata' above is also enabled.
- Ensure the setting is toggled to Enabled.
- Click on the radio selection for 'Specific security groups'.
- Add the Security Group configured above to the allowed list.
- Click on 'Apply'.
5. Add the Security Group to all Power BI workspaces#
Argus needs workspace-level membership in the Fabric Tenant to pull refresh history from the Fabric API.
This is a separate permission from the Admin API access configured above — it must be granted at the individual workspace level. We provide a PowerShell script that automates this by iterating through every group workspace in your tenant and adding the Security Group as a member.
Download AddGroupToWorkspaces.ps1
Prerequisites#
The script requires the MicrosoftPowerBIMgmt PowerShell module and a Power BI account with admin permissions.
If the module is not already installed, run the following in PowerShell:
Install-Module -Name MicrosoftPowerBIMgmt -Scope CurrentUser
Running the script#
- Download the script using the link above and save it to a convenient location.
- Obtain the Object ID of the Security Group created in step 3. You can find this in the Azure portal under Entra ID > Groups > [Your Group] > Object ID.
- Run the script, passing the Object ID as the
-groupIdentifierparameter:
./AddGroupToWorkspaces.ps1 -groupIdentifier "<your-security-group-object-id>"
- When prompted, sign in with your Power BI admin account.
- The script will pull the list of workspaces, then iterate through them.
- For each workspace, the script will attempt to add the security group as a member to the workspace using the following command:
 Add-PowerBIWorkspaceUser `
                -Scope Organization  `
                -AccessRight Member  `
                -PrincipalType Group `
                -Id $workspaceId     `
                -Identifier $groupIdentifier `
                -ErrorAction Stop `
                -WarningAction SilentlyContinue
- It will then output a checkmark for success, a circle if the group was already a member, and an X for any failures. If a workspace triggers rate limiting, the script retries it automatically up to three times before counting it as a failure.
- A summary of successful, already-added, and failed workspaces is printed at the end. If any failures occurred, the script exits with a non-zero code.
Note: If you encounter rate-limiting errors, increase the delay between requests using the
-delayMsparameter (default is 2000 ms):powershell ./AddGroupToWorkspaces.ps1 -groupIdentifier "<your-security-group-object-id>" -delayMs 500
Contact Argus PBI Support if you encounter any issues running the script or if workspaces remain inaccessible after it completes.